Drawing a koi fish can be broken down into simple steps. Here’s a step-by-step guide on how to draw a koi fish:
Step 1: Start by drawing an oval shape for the fish’s body. This will be the main form of the fish.
Step 2: Add a curve near the oval to form the fish’s mouth. It should look like a tilted “C” shape.
Step 3: Draw a bigger, wider curve behind the head to form the fish’s tail. Make sure the curve starts narrow at the base and gradually becomes wider as it reaches the end.
Step 4: From the base of the tail, draw two diagonal lines meeting at a point to create the tail fin. This will resemble a triangle shape.
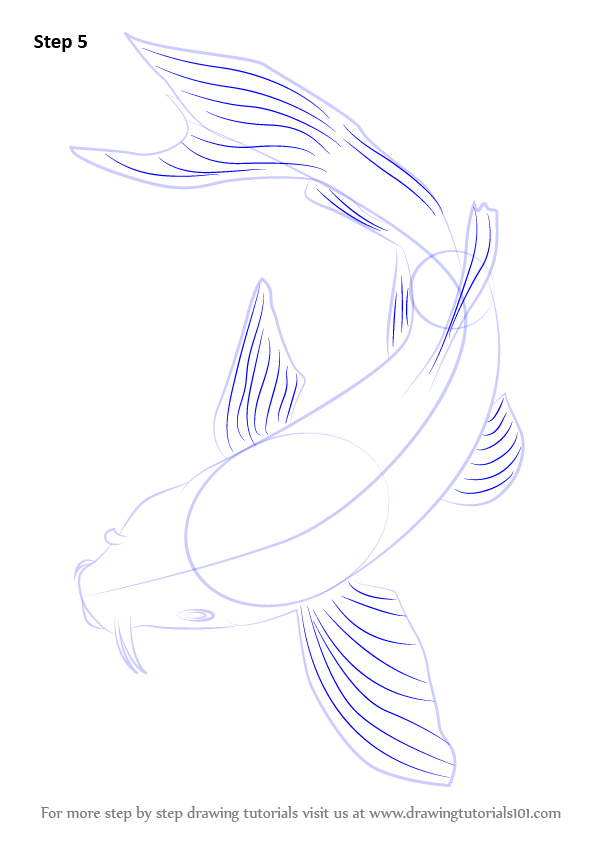
Step 5: Draw another curve near the middle of the body, slightly below the fin, to indicate the fish’s dorsal fin.
Step 6: At the front of the fish, add two smaller curves to form the pectoral fins. These will be located on either side of the fish’s body.
Step 7: Draw an elongated oval shape for the fish’s eye. Add a small circle inside the oval for the iris and a tiny circle or dot for the pupil.
Step 8: Add intricate details to the fish’s body by drawing lines across it. These lines should follow the contours of the body.
Step 9: Erase any unnecessary guidelines or overlapping lines, leaving only the final outline of the fish.
Step 10: If desired, add color to your koi fish drawing. Typically, koi fish are vibrant, so consider using shades of orange, red, yellow, black, and white to bring your drawing to life.
Remember, practice makes perfect, so feel free to refine your technique and experiment with different poses or styles for your koi fish drawing.
Know More About: koi fish how to draw
Koi fish, these graceful creatures of the water, have long been admired for their vibrant colors and elegant movements. Their distinctive patterns and symbolism have captured the fascination of artists and enthusiasts around the world. If you’ve ever wanted to learn how to draw these magnificent fish, you’re in luck! In this article, we will explore step-by-step instructions on how to draw a beautiful koi fish, allowing your artistic skills to dive into the depths of these mesmerizing creatures.
Firstly, start by gathering your drawing materials. You will need a sketchbook or drawing paper, a pencil (preferably a mechanical or HB pencil for versatility), an eraser, and a set of colored pencils or markers to add color later on.
Once you have your materials in hand, let’s dive into the drawing process. Begin by lightly sketching the basic shape of the fish’s body. The body shape resembles that of an oval, slightly elongated with a rounded head and smaller tail fin at the back. Remember, at this stage, it’s important to keep the lines light and easily erasable, as they will serve as a foundation for the more detailed features later.
Next, it’s time to add some definition to the koi fish’s body. Start by drawing the distinctive pattern on its sides. Koi fish are known for their unique and colorful markings, so feel free to experiment with different variations. Whether it’s a simple pattern of wavy lines or intricate scales, let your imagination run free. Add the large pectoral fins, which are triangular-shaped, at the sides of the fish’s body. These fins aid in propulsion and contribute to the overall sense of movement.
Now, let’s move on to the koi fish’s facial features. Draw a small eye near the top of the rounded head, paying attention to its placement and size. These eyes are often almond-shaped and can add personality and depth to your drawing. Beneath the eye, sketch a short, tapering mouth that gives the impression of a slightly opened mouth. This detail will enhance the natural elegance of the koi fish.
Once the basic features are established, refine the details of the fish’s body. Add the dorsal fin, which runs along its back, and the anal fin, located near the rear. These fins should be elongated, yet still maintain a flowing shape that complements the fish’s movements. Don’t forget to include the caudal fin, or tail, which is broad and fan-shaped, adding an element of majesty to your drawing.
Finally, add the texture and color to your koi fish. Using your colored pencils or markers, choose vibrant hues to bring your fish to life. From vibrant oranges and fiery reds to soft pinks and soothing blues, the color choices are endless. Be sure to include subtle shading and highlights to create dimension and realism. Take your time and experiment with different techniques to achieve the desired effect.
Drawing koi fish may seem daunting at first, but with practice and patience, you’ll be amazed at the beautiful creations you can bring to paper. Remember that every stroke counts, and each attempt will contribute to your growth as an artist. So, take a deep breath, dive into the world of koi fish, and let your imagination swim alongside these magnificent creatures. Happy drawing!
Key Takeaways from koi fish how to draw
Drawing koi fish requires attention to detail and understanding of their unique characteristics. Firstly, it is essential to study their anatomy, particularly the shape of their bodies and the positioning of their fins. Observing their colors and markings is crucial, as koi fish display intricate patterns that enhance their beauty. Pay attention to the curves and flowing lines that define their graceful movements. Incorporating water elements, such as ripples or splashes, can add a dynamic touch to the drawing. Mastering shading techniques is vital in capturing the iridescent scales and achieving a realistic representation. Lastly, practice regularly to improve skills and develop a personal style when drawing these captivating creatures.
FAQs on koi fish how to draw
1. How do I start drawing a koi fish?
To begin, sketch a basic oval shape to outline the body of the fish, adding a smaller oval for the head and a triangle for the tail.
2. What are the main features to focus on when drawing a koi fish?
Pay attention to the distinctive shape of the fish’s body, the flowing fins, and the patterns on its scales.
3. How can I add details to the koi fish drawing?
Use curved lines to outline the fins and tail, add small triangular shapes to represent scales, and draw expressive eyes and mouth.
4. Are there any specific colors to use for a koi fish drawing?
Koi fish come in a variety of colors, including red, orange, yellow, black, and white. Choose any combination of these colors for your drawing.
5. How do I create a realistic water effect around the koi fish?
Use wavy lines in varying sizes and directions to depict water movement. Add shading and reflection to give the water a more realistic look.
6. What tools do I need to draw a koi fish?
You can start with a pencil and paper for the initial sketch. Then, you may want to use colored pencils, markers, or watercolors to add color and bring your drawing to life.
7. Are there any specific techniques to make the koi fish look more three-dimensional?
Pay attention to shading and highlights. Add darker tones to the areas of the fish that would be in shadow, and lighter tones to the areas that catch the light.
8. How can I ensure proportion while drawing a koi fish?
Observe reference images or real koi fish to understand their proportions. You can use guidelines or measurements to maintain accuracy in your drawing.
9. Can I add my own artistic touches to the koi fish drawing?
Absolutely! Feel free to personalize your drawing by adding unique patterns, different colors, or experimenting with various art styles.
10. How can I improve my drawing skills for koi fish?
Practice regularly, study images of koi fish to understand their anatomy and coloring, and experiment with different techniques and styles to enhance your skills over time.