To tie a fish hook, you can follow these steps:
1. Hold the fishing line and insert it through the eyelet of the hook. Allow a few inches of line to extend past the eyelet.
2. Take the tag end (the loose end) of the line and wrap it around the main line, starting about five to six inches away from the hook. Make 5-7 wraps around the line, moving towards the eyelet.
3. After making the wraps, take the tag end and pass it through the loop created between the wraps and the eyelet. Pull the tag end completely through the loop.
4. Moisten the knot with water or saliva, then slowly tighten the knot by holding both the standing line (main line) and the tag end. Make sure the wraps are snug and close together.
5. Trim the excess tag end of the line with a pair of scissors, leaving a small tag to avoid the knot slipping.
6. Test the knot’s strength by giving it a firm tug. If it holds tight, you are ready to fish!
Remember to practice tying the knot several times to ensure you become proficient at it. Additionally, it’s essential to learn and use different fishing knots, depending on the specific fishing situation and hook type.
Know More About: how to tie a fish hook
How to Tie a Fish Hook: A Step-by-Step Guide for Anglers
Introduction:
Angling is a popular recreational activity worldwide, providing both entertainment and a chance to enjoy the great outdoors. However, before you can cast your line and reel in a big catch, you need to know how to properly tie a fish hook. This step-by-step guide will walk you through the process, ensuring that your hook stays secure and increases your chances of landing that elusive fish.
Step 1: Gather Your Materials
Before you begin, ensure that you have all the necessary tools at hand. You’ll need a fishing hook, fishing line, a pair of sharp scissors, and perhaps some additional terminal tackle such as a swivel or sinker, depending on your fishing setup.
Step 2: Choosing the Right Knot
Selecting the appropriate knot is essential to ensure your hook stays secure. The improved clinch knot is one of the most widely used and reliable knots for this purpose. It entwines the fishing line around the hook, providing a strong and durable connection.
Step 3: Thread the Line
Hold the hook between your thumb and index finger, ensuring the pointed end is facing upward. Take the end of your fishing line and thread it through the hook’s eye from bottom to top. Leave a few inches of the line extending beyond the eye to work with during the next step.
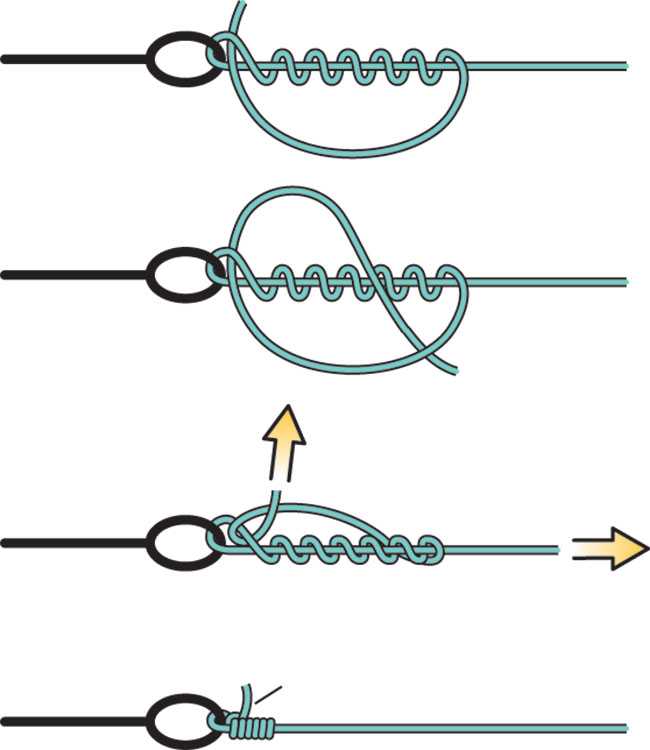
Step 4: Loop and Twist
With the fishing line above the hook’s eye, create a loop alongside the hook shank. Now, take the end of the fishing line and wrap it around the hook shank, passing the line inside the formed loop. Create at least five to seven wraps around the hook shank, ensuring they are tight and snug.
Step 5: Pass the End Through
After making the wraps, pass the end of the line through the loop you created above the hook eye. Ensure the line enters and exits on the same side of the loop, close to the eye. This will form a second loop.
Step 6: Secure the Knot
Hold the hook and the end of the line and pull them apart gently, slowly tightening the knot. Be careful not to let the wraps cross each other or overlap as you tighten. Once the knot is partially tight, wet it with some saliva or water for lubrication, and then fully tighten the knot by pulling on both the mainline and tag end.
Step 7: Trim Excess Line
Using a pair of sharp scissors, trim the excess line closely, leaving about 1/4 inch of tag end. This ensures the line doesn’t interfere with the bait or disturb the fish. Be cautious not to cut the mainline or tag end too short, as this may weaken the knot.
Step 8: Additional Tackle (optional)
Depending on your fishing style and the targeted fish species, you might need to add some terminal tackle. If using a swivel or sinker, thread it onto your mainline before tying the hook. Ensure the additional tackle is positioned correctly to prevent any line twist or interference with the hook knot.
Conclusion:
Mastering the art of tying a fish hook is crucial for any angler. Following these steps and practicing regularly will help you perfect the improved clinch knot, ensuring a reliable and secure connection. Remember, a well-tied hook increases your chances of landing the catch of a lifetime. So, grab your gear, head out to the water, and put your knot-tying skills to the test!
Key Takeaways from how to tie a fish hook
When tying a fish hook, keep in mind these key takeaways: first, choose the appropriate type and size of hook based on the fish species and bait being used. Second, ensure the line is securely attached to the hook eyelet. Third, hold the line and thread it through the eyelet, forming a small loop. Fourth, wrap the line around the shank of the hook, creating multiple turns. Fifth, carefully thread the line through the loop formed earlier. Finally, tighten the knot by pulling both ends of the line while ensuring the knot rests snugly against the eyelet. Practice makes perfect, so don’t be afraid to try different variations and see what works best for you.
FAQs on how to tie a fish hook
1. How do I tie a fish hook onto my fishing line?
To tie a fish hook, start by threading your fishing line through the eye of the hook. Then, make a loop with the line, wrapping it around the main line. After that, pass the tag end of the line through the loop four to five times, and finally, tighten the knot securely.
2. What type of knot should I use to tie a fish hook?
The most common knot used to tie a fish hook is the improved clinch knot. It is easy to tie and provides a strong, reliable connection between your line and hook.
3. Can you explain the steps to tie an improved clinch knot?
Certainly! To tie an improved clinch knot, thread your line through the eye of the hook. Then, make five to six turns around the main line with the tag end, passing it through the small loop created above the eye. Lastly, moisten the knot and slowly pull it tight.
4. Should I wet the line before tying a fish hook?
Yes, wetting the line before tying the knot makes it easier to tighten and reduces friction against the knot, ensuring a stronger connection between the line and hook.
5. How do I test the strength of a tied fish hook?
After tying the knot, gently tug on the hook to check its strength. The knot should hold firm without slipping or breaking. If it feels secure, you’re good to go!
6. What do I do if the fish hook keeps slipping out of the knot?
If the hook keeps slipping, you might be tying the knot incorrectly or with inadequate tension. Re-examine the steps and ensure you wrap the tag end around the main line a sufficient number of times before tightening the knot.
7. Can I use different knots to attach a fish hook?
Yes, apart from the improved clinch knot, you can use other knots like the Palomar knot, Uni knot, or Trilene knot. These knots are equally effective and provide a strong connection between the hook and line.
8. How can I learn to tie a fish hook properly?
The best way to learn to tie a fish hook properly is through practice. Watch video tutorials or read step-by-step instructions, and then practice tying the knot multiple times until you feel comfortable and confident.
9. Are there any tools that can help with tying fish hooks?
While not necessary, some anglers find tools like hook-tying devices or knot-tying tools helpful. These can assist in ensuring a secure and consistent knot every time.
10. Can I reuse the same knot after catching a fish?
It is generally recommended to retie the knot after catching a fish, especially when using a strong line or targeting larger species. Repeated stress or abrasion can weaken the knot, so it’s better to err on the side of caution and tie a fresh knot before each fishing trip.